
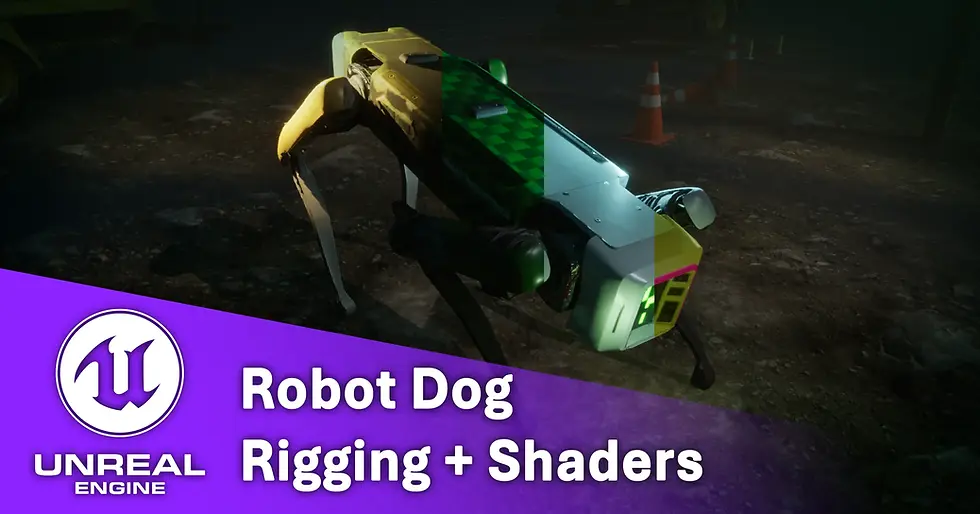
Robot Dog Project
- Jan 18
- 6 min read
Introduction:
Hello there, this quick project is a short test to push my technical character skills under a tight deadline of 3 days. I have blocked out some days to fully work on getting a character mesh game ready, rigging, skinning alongside creating animatable shaders in engine to allow easy artistic iteration.
Project Outlines:

In this project I want to optimise and rework this high poly model of spot, a robot created by Boston Dynamics (Boston Dynamics, 2019). This fantastic detailed model is created by Julliani (Julliani, 2024): https://sketchfab.com/3d-models/spotboston-dynamic-high-poly-058b16a8c88047e18b1f081e0d15f883. I chose this model because I love dogs and I love robots so creating shaders for a shiny quadruped sound like a fantastic challenge.
The timeline for this project is 3 days in which I will need to:
Retop and optimise the original high poly model
Retexture the original shell
Create a shader that will allow easy editing of panel colours, dirt accumulation and shapes/decals on the surface.
Rig and skin the mesh to be game ready.
Animate and/or pose the mesh according to reference material from Boston Dynamics. (Boston Dynamics, 2019)
Import and setup in Unreal Engine for real-time rendering.
Let’s jump straight into it!
Retopology and Mesh Optimisation:

To start off I needed to optimise the mesh heavily as the original model ended up being 900k tris. This is great for CGI or cinematics but would run poorly in Unreal Engine. I knew under the limited timeframe I would need to divide my time into retopping parts of interest such as the body shell and front panels manually for the best result when UV unwrapping. For the remainder of the mesh, I used Houdini’s polyreduce nodes to drastically drop the tricount down as much as possible. This did however crunch the centre shell which is why I needed to manually retop that. In the end, after automatically uving in Houdini and symmetrising the final parts. The final model tricount ended up at 51,419 which is drastically lower than the original mesh. I know will LODS the model could be dropped lower as there are still parts of the underside of the mesh that could be simplified however I do not have the time for these steps in this project.
Creating Masks and Vertex Colours:

For my shader to work I needed to bake masks down for dirt, edgewear and positional data. For this I used generators from Substance Painter and exported those maps out as grayscale data then channel packed them in Substance Designer. I also wanted to be able to recolour panel pieces and I did consider baking masks as well for the body however realised that as those mesh parts are separated, I could instead use vertex colours. The vertex colour channels would allow easy colour masking that could also be flipped to use as a opposite mask. For example, by masking out the body in one colour, the legs in another and the highlight outline I could interchangeably create masks for everything but the highlight, one leg at a time or different body pieces by subtracting them from each other. For time constraints I focused on highlighting the 3 primary areas: body shell, head highlight rim and legs.
Rigging and Skinning:

Before I exported everything to engine, I needed to rig my dog to animate and pose him similar to how Spot responds in real life. I knew that as a quadruped the CAT system in 3DSMax would work best thanks to the way the bones are linked to create natural motion between the legs and body. I started at the pelvis, rigging the legs next and moving onto the front legs and head. Since the model did not have a moving head nor a tail, I did not need to add any neck bones or supports.
After rigging I added a skin modifier and checked my default weights. Unfortunately, the default skinning applied weights that would work best for an organic mesh, but the panel shell body of the dog does not need to deform like a realistic skin does so I had to begin fixing weights. I first animated a skin motion path with keyframe to pull out every leg, torso and general body up and down to test the extreme angles the dog could be placed at. This helped immensely in finding out which bones were still distorting the mesh as I was animating them one at a time. After this I exported everything with a simple “inspect floor” animation (like the one from Spot trailer video) over to engine for better setup.
Creating Shell Shader:

I first began by building out my graph on masking the colour panels. I used lerp nodes to blend colours and static switches to allow it to be completely toggleable from an artist standpoint on what elements to recolour. Following this I worked onto using more lerp nodes to blend in dirt masks from my channel pack texture.
These masks work well together to buildup more and less dirt however I realised that the colour information ended up looking quite bland. So, using a smaller texture noise tileable I created variable in the dirt colour based on that value.
Heres my full graph:

After cleaning up the node graphs and plugging in the remaining PBR values (such as roughness and metal masks too). Here’s some examples of what you can make from an artist point of view:

Adding Stripes, Symbols and Shape Inserts:
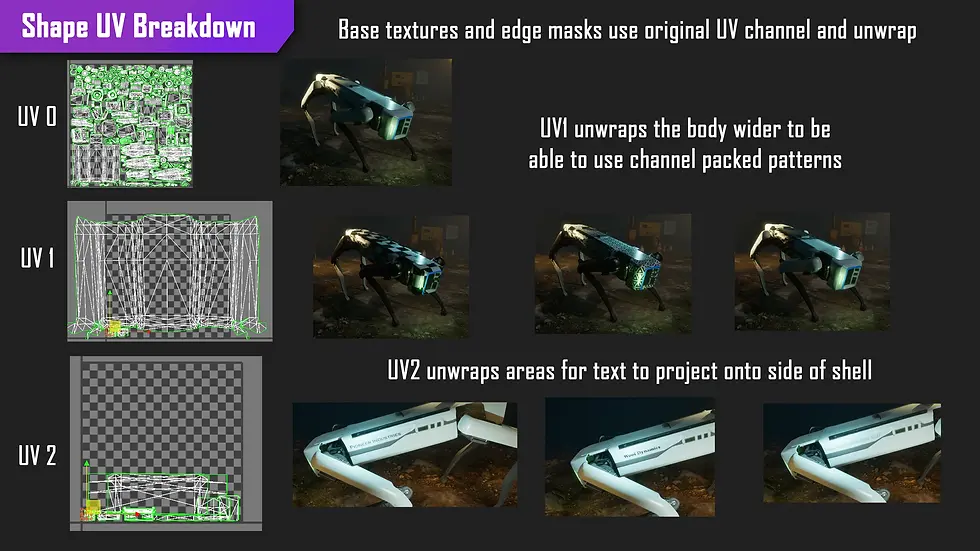
I knew that I wanted to make it easily to swap branding on the mesh itself from an artist standpoint however having to texture a map that aligns perfectly with the UVS would defeat the point of an easy to change shader graph. So, I instead used the secondary UV channel on the mesh and UV unwrapped the areas that would work well to this planned decal trim sheet. After reimporting the skin and exporting back to engine here’s the result. By making the texture a parameter the artist has infinitely more control by simply making variant textures to plug and play in using Photoshop. I repeated this for text and emoticons for the front panel.
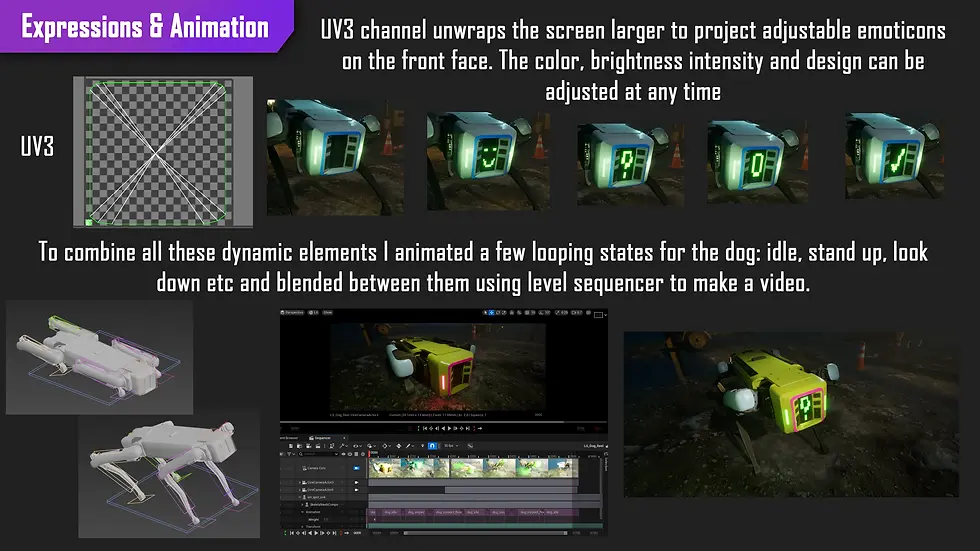
More Fun Animation & Engine Renders:
To really show off both the surface shader and the model quality I animated some more states for the mesh to be in. For reference I watched some videos of Spot being used in action alongside the original launch trailer.

I really loved the wiggle and panning states the robot does when inspecting in the video. I ended up animating: stand animation, idle, look up and look down. I did attempt a walk cycle however struggled to capture the weight the legs have when balancing the shell as the robot dog has a battery in the centre. Making it balance very well but have inconsistent walk patterns.
These states can be toggled in engine or transitioned between using a level sequencer and crossfading the states. By using level sequencer in engine, the material shader can also be animated swapping between states. Check out my video render here:
Project Conclusion and Reflection:
To reflect on this quick project, I pushed my skills to the test in creating a dynamic character mesh that is fully adjustable in engine and supports animations. If I was to do this project differently, I would consider adding more bones for adjustments as the robot has varying extras like an arm, screen or camera add ons that would add to the modularity this asset. I would also like to attempt to reduce the tricount by creating LODS or manually retopologising more of the mesh. Animation was also one of the parts I had the most fun in so I definitely want to do more for characters and props with this in the future. Furthermore, I would like to in the upcoming projects explore how Unreal Engine handles retargeting between different skinned robot meshes to continue to develop my skills in this category of technical art.
Resource Bibliography:
Julliani. “Spot(Boston Dynamic) High Poly.” Sketchfab, 30 Apr. 2024, www.sketchfab.com/3d-models/spotboston-dynamic-high-poly-058b16a8c88047e18b1f081e0d15f883 . Accessed 14 Jan. 2026.
Boston Dynamics. “Spot Launch.” YouTube, 24 Sept. 2019, www.youtube.com/watch?v=wlkCQXHEgjA.
Fab. “Construction Site VOL. 1 - Supply and Material Props.” Fab.com, 2019, www.fab.com/listings/ba44a508-bfa5-444c-bbf4-69e8b5dee530 . Accessed 14 Jan. 2026.
---. “Roadside Construction.” Fab.com, 2024, www.fab.com/listings/6426cc8a-2410-45be-b3ce-edfea87d09cc . Accessed 14 Jan. 2026.


Comments