
Pipe Generator Tool (Full Blog)
- Jun 16, 2025
- 18 min read
Updated: Jul 12, 2025

Week 1)
To dive into doing more Houdini I’ve decided to complete a 4 week industry brief to create a spline-based pipe tool. I’m pretty confident in creating shaders but creating procedural geometry to support them will be even more fun. Let’s jump into analysing the brief requirements and expectations
Project Brief:

The project aims are to create a procedural pipe tool with shaders.
Requirements: tool needs to utilise metric units, come with documentation and good UI. Everything must be modelled and inserted or procedurally generated for geometry. For textures there is a max limit of 2 x 2048 maps which can be reduced to say 4x 1024. Tube designs must be rigid pipes and support placement of gauges, valves and other geometry. All this needs to be optimised for current generation, outputting data that is automatically named. Splines should also support intersection (T-junctions).
Planning and Timespan:

This is a 4-week brief however as I am writing this, I will be attending some events at the end of the month and have a lot of busy weekends means I want to ideally get it working before then. For now, the deadline is full competition for the 7th of July. I may leave documentation right till the end to ensure I can get the rest of the tool up. My schedule looks like the following on top of my fulltime job.
Research – Pipes

I needed to do some research into how pipes really work for easier modelling. I initially considered making them as modular kits to be inserted however this will be more costly in the long run especially for covering long distances. To alleviate this all geometry will be procedurally generated. To summarise my research, copper pipes which are my goal to recreate can be used in a ton of spaces but what really matters is inner thickness. Theres type L marked with blue, or type M marked with red which have different uses. Type L (remember this as less light L) is used for water lines in houses and Type M (lighter M) is used for heating, light water and gas stuff such as central heating.

So why does this even matter, I want this tool to allow the artist to change the thickness of the pipe to create either type or as stretch goals a shader that showcases the colouring would be great. I will also be aiming to hit my master references as my visual outcomes. Which means the generator needs to be able to spawn 90-degree elbows, T shaped half inch pieces (3-way connector), couplers, valves, t-bracket metal things and insulation overlay. To meet my brief, I can push some elements like brackets and insulation to stretch goals.
Research – Demos
This is my first rodeo to procedurally spawning geometry in Houdini. So, I have taken to researching a few demos to help me make some tools which I can build upon and improve for my brief. The first is a short video by Viktors Anfimovs (Anfimovs, 2020) that uses curves to a round tube sweep node. This immediately gave me insight on how I can create points to spawn flanges in between curved parts of the tube which was super helpful. However, there’s not a lot of control nor do I understand how I could add couplers to the mix, would I blast cut geometry around these corners or spawn another set of tubes that is slighter thicker at these intersections?
My second found demo which was a whole series created a bit longer ago in 2019 by Dokai (Dokai, 2019) was an absolute godsend. The organisation, UI setup, UV unwrapping and masking using spheres extruded which are then added to sweep to recreate the tube pipes. I am not kidding when I state that this series rewired the way I thought to create user friendly design for tools, doing some extra math to convert parameters into consistent scale values and sliders. I really loved this series and the outcome came out well minus a few issues I encountered due to nodes being updated featured below.
Making Pipes:

To make the pipes, the attached curve has corners smoothed using a controlled Polybevel. A circle is used with a sweep to create the tubes.

For making the corners/flanges, a subnet containing another circle is used but with polyextrude. If set with the toggle, a more jagged flanges can be spawned on corners. For isolating the corners of the original curve, a carve and group by range is used.

The carve is set to 0-1 to expose the entire curve and the group by range for 1-2 (offset 1) forces selection of every other point. This targets the corners as every straight ends up into a corner. Copy to points is then used to grab the flanges/corners to the cut outside sections.

For making the valve, the entire set is modelled out of extruded circles again. However unlike the demo I had some issues with making sure the locations the pieces were spawning in changing based on thickness. For example, if I adjusted the radius of the pope below the valve, the valve would become floating.

So to fix this I blasted off the top face of the valve and other components, then used a great bit of script by DPixel8R (2019) I found on Reddit to get the centre of the face. Then I used this as my spawn location on a transform node. This worked well!

UVS and Bugs:
As the tutorial is quite a bit old there are multiple nodes that work differently the core ones being sweep. I initially wanted to use sweeps UV methods to easily create UVS but found that the result was very scrunched up on corners. This would result in poor texel density in engine. I have some screenshots of my testing there:

To remedy this I used a script that Dokai thankfully covered in another video to wrangle manual UVS then fuse each point. This resulted in way smoother result.

A bug I haven’t been able to resolve yet is to do with the valve spawning system. Currently when a valve is spawned, by duplicating the previous Polybevel, carve then group in range blast to get rid of corners a curve is fixed to only spawn on straight sections. This entire bit of code is in a loop function called for each number.

It looks good right until execution where regardless the valve will ghost along the paths anyway. Despite the fact another carve further down limits the starting area forcefully chugging the valve along the path, the valve will still be allowed to be placed there. As it is not breaking the generator, moreso a inconvenience I will let this live.

Tool Progress in UE:
This is how the pipe generator looks and works so far in UE! I'm quite happy with the UI setup especially as it can stop generation until a good curve is set by using workmode toggle.
Next Steps:
I want to add further controls for more pipes being generated from the same splines, intersections (t connectors) and more parts in general. Alongside this I need to create better shaders for metal that showcase wear, rust and welding to a more realistic degree.
Week 2:
Redesigning UI:

I knew there was a lot of changes I needed to add such as override controls and material adjustments parameters so I redesigned the UI to help get a better foundation for adding these in. As shown the higher amount of toggles and drop-downs would mean swapping from the Simple to Tabbed view (on folders).

Additionally some sections could be moved around depending on how well they work such as the pipe details and pieces parameters. You can see the current implemented state here which is still subject to change as I add or remove features later. In this state however I should meet all brief requirements should the features work well later.
Duplicating Pipes:
After reviewing my reference I realized that a lot of pipes are duplicated as heating systems need multiple lines to transfer water or gases up to a room. To make this process easier I added a optional toggle to duplicate the mesh through a for loop with iterations. To duplicate the pipes I use a for each node to grab the initial pipe and duplicate it on the specificed number of iterations. I can then multiply this value on a transform to offset it by grabbing "iteration" from the metadata.
However I encountered a issue here with rotation as offsetting tall pipe structures on the same axis they face would make them clip into each-other. So I added rotation control too by exposing the transforms value and adding two extra transform nodes before/after the effect which can be toggled by a switch to transform after or before, preventing clipping.

To finalize this I used a toggle switch to add the original pipe back on for more variation using a merge node if needed.

Inserting Valves using Collision Box (and a ton of troubleshooting):

My hardest challenge so far was getting chosen parts to spawn where required. I started in Houdini giving boxes names such as "valve", "socket" and "bracket" then coloring boxes to spawn. After doing more research into how Vex works, checkout Vex isn't scary series it's a phenomenal watch!, (Nine Between, 2021) , I was able to grab the name and assign a number for the switch node to use using if statements. These temporary placeholder box colors worked well however I encountered a large issue when it came to consistently spawning actual geometry.

To spawn, I use a boolean to cutout the pipe and grab the center (centroid) of the mesh as a point. Then using copy to point I can spawn to that point the needed piece. However this lacked the normal direction of the curve below so I used a transfer node to grab the N value across, correcting the direction. At times this would bug out so I opted for a third attempt at booleaning the pipe piece out, centroid the mesh there fora point to use copy to points the needed piece. This worked most consistently so far.

Remodeling the Valve:

The valve I have at the moment is a direct recreation from the tutorial and overall has a more industrial design. Its a large valve, which doesn't really fit a smaller household set of heating copper pipes which I want the tool to generate. So I found a much smaller valve similar to a ball valve which I procedurally modelled using a similar setup. Below is a breakdown of all my nodes I kept it simple and spawned elements where they needed to be using blast and copy to point nodes for the ear parts of the valve for example.
Modelling Procedural Brackets:

I used very similar nodes to make the brackets. However to save on creating the bolts I duplicated it and removed a lot of division control. This is to prevent the bolts faces from being changed from hexagonal, the standard type of bolt. Furthermore the scale of the bolt is very small so the overall piece is low poly and needes scaling uniformly.
Modelling Sockets:

For modelling the socket I wanted artist control to make larger or smaller pieces depending on the bounding box. To create it I reuse the final pipe geometry and boolean it to the inputted box. There is a small tendancy for the boolean to go haywire and grab the entire pipe to extrude so for this portion I added a switch. If the extruded count is too high the socket is ignored using a bit of code for npoints node. This has helped resolve the issue and by adding more subdivisions to the pipe below being booleaned, the issue happens less frequently. Unlike the corner pieces, the socket is fitted closer to a t-junction piece and is welded for a water tight seal hence there being a lack of raised start/end points.
For-Loop Placement in Engine (and more bugs!):
To make the tool easier to use I knew I wanted a easy way to spawn the pieces using some sort of names. In Houdini the tool worked well using the for each named piece node that looped based on different primitive names. This however did not work once in engine as the static meshes were all technically the same cube mesh but with different names ontop.

The most common thing shared between between cubes would be the material which I could luckily grab using a wrangle for unreal_material. I could then search for a keyword in the wrangle and assign it the correct switch number. This worked well until I tried adding duplicates cubes sharing the same mat in the same input slot which the graph just ended up ignoring.

I fixed this by adusting the for each loop function, as the primitives have the same name of unreal mat it would disregard those after it unless I used a connectivity node. This would automatically add a numerical class to all primitives inputted and worked well.

Honorable Mention Scale Bugs (base mesh logic scaled parts individually to match pipe size but this would break at smaller sizes) Now all pieces have been converted to uniform scaling.

Next Steps:
I'm quite happy with the spawning systems so far and the new design for my user interface has helped shape what I need to add next. A crucial feature of pipes is their t-shape intersections to help connect varying pipes and flows together. This is a big element I need to add next to finalise the construction side of my generator before doing some shader work.
Week 3:
Creating T-Intersections:
One of the hardest challenges so far was making a self detecting intersection logic. The easiest way to set this up is to allow another curve input and then use a curve intersection node to cut out the areas where they cross however to make it easier for a artist to use I wanted the initial curve to be able to create intersections.

My first attempt I cut the curve out manually and then extruded the shape ontop to recreate the pipe. This ended up not working well as I had difficulties cutting the curve with a cube shape. I then tried booleaning the final pipe which worked much better as I could cut out the box area directly. Similar to how the sockets work.

However I ended up encountering a weird bug when spawning the edge corners, the cutting would sometimes go haywire and blow up triangles. To avoid this event that happened every so often I added a switch n-points node to look for when values would go insane and stop the spawn altogether. I will fix this eventually but for now need to focus on finishing this tool.

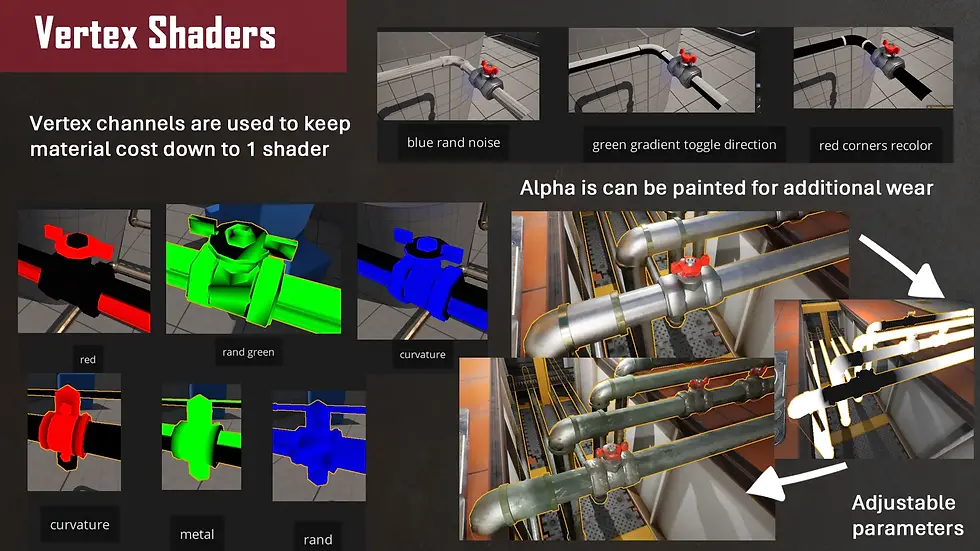
Vertex Painting Setup

My initial plan was to vertex paint the pieces using the following values. However after importing them into engine I realised I was wasting a lot of valuable vertex data in masking.

For example the red mask could serve to divide the top colored metal from the bottom part using a one minus node to flip the two. I then had 2 more channels (3 if you count alpha in UE) to add more masks. I ended up using the color channels shown here instead.

I experimented with the measure node which I wrote a bit of VEX for to apply the selected groups as values in Cd. I eventually settled on packing curvature into blue for wear edge masking and randomised noise into green for further value variation. I knew these pieces would be small however I wanted artists to have control later in engine using shaders which is why curvature is important for grabbing the data between points for wear and tear.

Adding Materials for UE:

This was quite simple by pasting the references of my material instances into the unreal_mat node in Houdini. However the real troubles began when realising that there is a whole /game bit that is not needed by the referencing but would appear on a copy paste from a artist point of view. I wrote a bit of vex to get rid of this by splicing the string in two parts to remove the bit before but combine the rest again.

Fixing Bugs - Missing Vertex Painting

Another challenge was merging the vertex colors I applied. I struggled quite a bit with this as the output kept turning black and ended up missing in Unreal. I uncovered that the color nodes had actually reset my painting and so I had to blast of pieces of the mesh to combine. Further the Cd wrangles I was doing early were applying to primitive and not points, which the merge was struggling to combine. I swapped the tabs to run on points and added a attribute delete to remove any excess Cd data when merging to prevent overwritingpieces such as amy parts. I added all these pieces to a group called "nope" to stop the overwriting with a blast node.
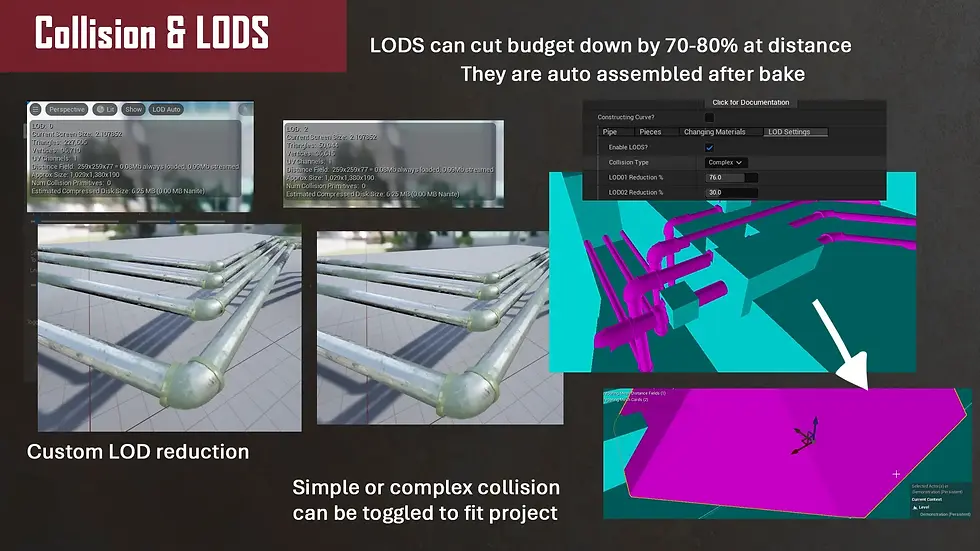
Adding LODS:

It was quite quick and easily to add LODS, by using a poly reduce node I could then group this geometry as LOD_0 or 1 etc. When poly reducing the pipes a lot of weird results began to occur due to very harsh low poly nature of the pipe so I used the vertex group painting mask I made earlier to seperate the pieces to blast those off. I then could poly reduce these meshes and merge back. This cut the budget in 50/70% at times which proved highly useful in engine. I need to expose this as a parameter to allow artists more control on the reduction as a whole + distance of screenspace.
Adding Collision:

I initially tagged LOD0 as simple collision. This spawned a rather large box across the entire pipe. This is not ideal especially for corridors lined with pipes as the player would no longer be able to pass through. To make it playable collision I swapped to generating complex collision however will add a toggle should the artist be making more background pipes.
Fixing LOD Bug and Finalising UI:

At this point there was a lot of parametres I wanted to add to improve runtime experience. Such as spawning intersection pieces once before duplicating meshes or only after duplicating mesh (for unique placements) which I made swappable with a switch. Another feature was removing LOD spawning during initial construction as the preview would have all meshes intersecting into eachother, a odd bug that fixed itself on bake.

Here is the final UI layout:
I ended up cutting some toggles to do with the vertex painting direction to ensure my project was completed in time for the brief.
Creating Shaders for Metal and Pieces

I began by drawing out the vertex colors I would need to mask in the shader. I realised that at first I was looking at the color values quite one dimensionally. Such as the red valve the vertex painting of white values on the valve and black on the metallic segments could be used as a mask for both rather than the green as well by inverting the mask with one minus. So for green and blue I packed a curvature map for edge wear and randomised gradients to breakup values. I could then use the alpha channel in engine as a paintable wear control to allow artist control. On the shader side I plugged in the varying vertex controls into LERPS to isolate colors paired on masks. I duplicated this for roughness and metallic.
In the brief I had a 2048 total texture limit so I split my noise channel packed textures into 2 1024s. This allowed me consistent noise and wear in 8 channels which I created using Substance Designer. Back to engine, I plugged this into the lerps to add noise to the white areas. I created parameters of floats to multiply the effect and intensity. Before plugging into the master blending lerps I saturated my results to prevent values above 0 to 1 which ended up in weird visual colors. For more control with switching off blending altogether I used static switch parameters which allowed a Boolean type toggle.
Week 4:
Creating Shader Instances

For easier artist drop in and drop out features I created instances for metallic copper, gold, silver and worn variants. These can also be overwritten in engine to create unique instances of metals. I have multiplied and grouped parameters to make them easier to understand from a general user point of view and will expand on them in documentation.
Documentation Button and PDF:
To make it easier to access I always upload my documentation to my site via a pdf. I tried to create a python script in the Houdini node graph but struggled to incorporate a button that would work and not cook entirely when pressed. That’s when I uncovered you can just incorporate python directly to the button on the overall type properties as long as its under scripts + named python module. I used pythons webbrowser to open browser to my inserted web page.

For writing my documentation, I focused on my end user being a non-technical artist. So I used a lot of visual pictures and graphs to step by step showcase how to use the tool. I also structured the chapters by way of the tabs so the further you are in the tabs e.g. material referencing; the pages should align. I also included a troubleshooting section as I encountered some frequent bugs during cooking and intersecting pieces. These ended up being an odd recompile/unreal UI bug that made other inputs disappear but can be fixed with a bit of wrangling.
Usage in Environment:
To demonstrate my tool in a real environment I migrated my HDA to Factory Environment Collection by Denys Rutkovskyi (2024). The industrial structure of the factory alongside metallic robot arms really blended well with my shaders.
Final Renders:
Here are all my final renders, breakdowns and videos!
Read my documentation here!


Project Post Mortem:

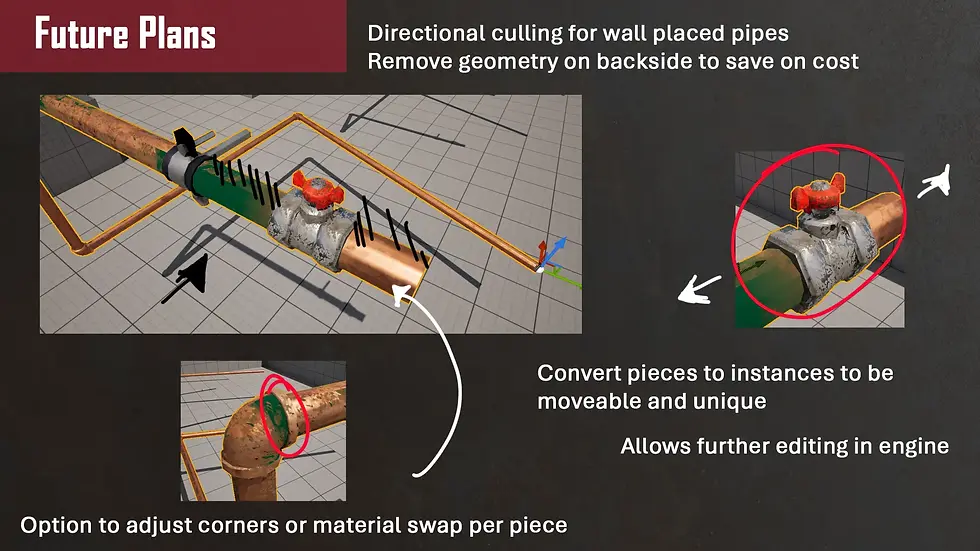
Note – I am writing this post Develop Brighton where I have obtained brilliant feedback from varying devs/technical artists. I am pleased with the project outcomes however on a critical scale can see that there is a lot of holes with this tool. Artist editability is quite limited on a part-by-part basis alongside finalised mesh size being quite large. There is more optimisation that needs to be applied to create better LODS, I have been advised to use methods such as directional culling to grab the location of the camera and cut out unnecessary back faces. Furthermore whilst this is my largest venture in Houdini, I had a large struggle with fixing bugs that occurred parsing data back and forth.
Not even mentioning the number of crashes that occurred. Whilst I really love Houdini and want to do more in it, I have been advised that PCG at least for Unreal Engine is being heralded as the next best thing in procedural generation. And I can understand why, its already in Unreal so grabbing classes, names, all sorts of data is not an issue. I think my next project is going to be based in PCG to dip my toe into this world, however the lessons I have learnt in Houdini will definitely carry through to this project.
To be fully honest I’m not 100% satisfied with this project but I have enjoyed the journey I have had learning Houdini. If I was to make it again I would focus on trying to breakup generations. Such as randomising the mat id per piece by counting primitives to make random metal pipes or exposing each part as an instance so they could be adjusted after generation. Small changes that if considered earlier would have impacted the tool in a much larger scale. I want to return in the future to add these features, but that will be an add-on update post brief. I will leave it here for now, and pop onto more Unreal! There is still so much to learn and I’m excited to dig in. Stay tuned!
Bibliography:
Dokai Tutorials (2019) Procedural Generated Pipe - Part 1: Generating Geometry, YouTube. Available at: https://www.youtube.com/watch?v=0Kk0tHp0Ax8 (Accessed: 12 June 2025).
Skill Builder (2022) How To Solder Copper Pipes Like A Pro, YouTube. Available at: https://www.youtube.com/watch?v=pl_Q2_hcs-8 (Accessed: 12 June 2025).
Viktors Anfimovs (2020) Creating procedural pipes in Houdini tutorial. (free HDA download), YouTube. Available at: https://www.youtube.com/watch?v=Ovj1m6pV1rE (Accessed: 12 June 2025).
Work Life (2022) Types of Copper Pipe, YouTube. Available at: https://www.youtube.com/watch?v=lyUxhWZoNCM (Accessed: 12 June 2025).
DPixel8R (2021) Reddit - The heart of the internet, Reddit.com. Available at: https://www.reddit.com/r/Houdini/comments/r5zht9/get_middle_points_on_any_geo_code_in_comments/ (Accessed: 13 June 2025).
bolegna (2020). Drive a switch with a detail. [online] od|forum. Available at: https://forums.odforce.net/topic/46745-drive-a-switch-with-a-detail/ [Accessed 15 June 2025].
Ellyfish (2018). Boolean subtract geometry from curves? [online] od|forum. Available at: https://forums.odforce.net/topic/32637-boolean-subtract-geometry-from-curves/page/2/ [Accessed 15 June 2025].
Oskar Świerad (2018). How to create vertex color masks for Unreal in Houdini – Tech Art Aid. [online] Tech Art Aid. Available at: https://techartaid.com/tutorials/store-data-in-vertex-color-using-houdini/ [Accessed 15 June 2025].
reddit (2021). Reddit - The heart of the internet. [online] Reddit.com. Available at: https://www.reddit.com/r/Houdini/comments/q0eqqv/vex_integer_to_float/ [Accessed 15 June. 2025].
sidefx (2006). How do you check to see if a curve intersects itself? | Forums | SideFX. [online] Sidefx.com. Available at: https://www.sidefx.com/forum/topic/6311/ [Accessed 15 June 2025].
sidefx (2017). Select primitives or edges by angle | Forums | SideFX. [online] Sidefx.com. Available at: https://www.sidefx.com/forum/topic/48424/?page=1#post-218882 [Accessed 15 June 2025].
sidefx (2018a). How remove letters from end of a string ? | Forums | SideFX. [online] Sidefx.com. Available at: https://www.sidefx.com/forum/topic/54924/?page=1#post-343200 [Accessed 15 June 2025].
sidefx (2018b). Quick Python: callback script fom button parm ? | Forums | SideFX. [online] Sidefx.com. Available at: https://www.sidefx.com/forum/topic/59236/ [Accessed 15 June 2025].
sidefx (2019). Attribute Value as Label? | Forums | SideFX. [online] Sidefx.com. Available at: https://www.sidefx.com/forum/topic/67955/ [Accessed15 June 2025].
sidefx (2021). How To Access Polygon Count And Set As An Integer Value | Forums | SideFX. [online] Sidefx.com. Available at: https://www.sidefx.com/forum/topic/82030/?page=1#post-352988 [Accessed 15 June 2025].
sidefx (2025a). Attributes and Groups. [online] Sidefx.com. Available at: https://www.sidefx.com/docs/houdini/unreal/attributes.html#utohinput [Accessed 15 June 2025].
sidefx (2025b). Attributes and Groups. [online] Sidefx.com. Available at: https://www.sidefx.com/docs/houdini/unreal/attributes.html#uetohoudini [Accessed 15 June 2025].
sidefx (2025c). foreach houdini documentation. [online] Sidefx.com. Available at: https://www.sidefx.com/docs/houdini/vex/functions/foreach.html [Accessed 15 June 2025].
Nine Between (2021). VEX Isn’t Scary - Part 1: Basics. [online] YouTube. Available at: https://www.youtube.com/watch?v=k4q1UQp4x6U [Accessed 12 June 2025].
sidefx (2025d). Measure. [online] Sidefx.com. Available at: https://www.sidefx.com/docs/houdini/nodes/sop/measure.html [Accessed 15 June 2025].
sidefx (2025e). Parameters. [online] Sidefx.com. Available at: https://www.sidefx.com/docs/houdini/unreal/parameters.html [Accessed 15 June 2025].
sidefx (2025f). Strings. [online] Sidefx.com. Available at: https://www.sidefx.com/docs/houdini/vex/strings.html [Accessed 15 June 2025].
Sidefx.com. (2025). Arrays. [online] Available at: https://www.sidefx.com/docs/houdini/vex/arrays.html#declaring-array-types [Accessed 15 June 2025].
Fab (2025). Fab. [online] Fab.com. Available at: https://www.fab.com/listings/2ee66462-8c2b-4303-892c-83f7fc0d9b3e [Accessed 12 June 2025].


Comments