
Dungeon Delve Project
- Jan 29
- 3 min read
Updated: Feb 1

Introduction:
Hello there, this post will discuss my quick 3-day diorama project: dungeon delve. This project was created to help teach various environment aspects such as vertex painting and the unreal foliage tool. However, it also proves a great example into creating a kit suitable for terrain, stylised shaders and magic VFX for a fantasy scene with fully animatable components. I have since added some LODS for better performance on lighter platforms.
Creating Vertex Painting Textures:
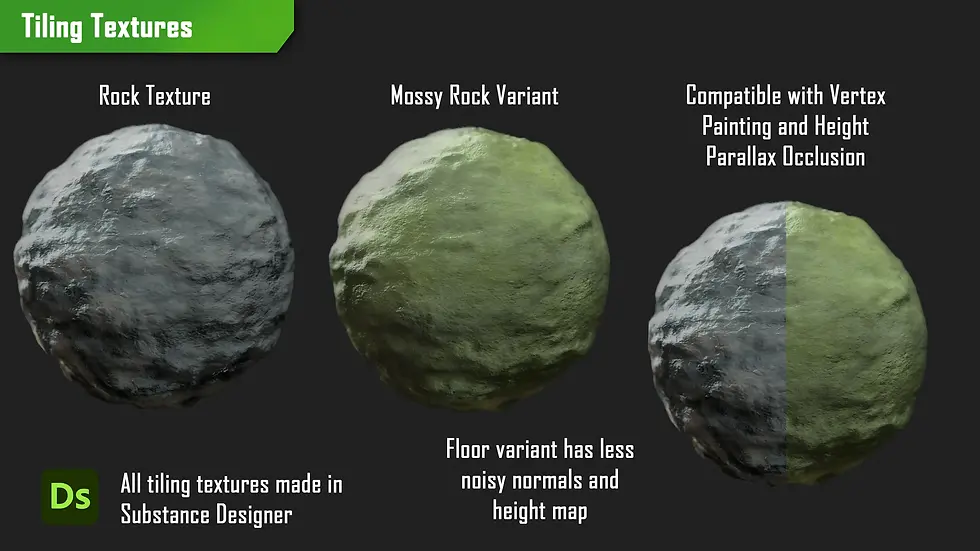
I used Substance Designer to create 2 key textures for my wall and floor. These graphs ended up being quite similar due to surface values. I did however make variants by redragging the graphs to be used as subgraphs for the mossy variant as that only needed a basecolor pass to fit better.

Now back into engine I imported my textures and setup a vertex painting material that uses a texture bombing node to better randomise my UVS. I also included a height channel for Parallax Occlusion however this can all be toggled off as these are expensive operations.
Creating Assets:

To create my assets, I created a quick sketch of what I needed to have to make my diorama and went into sculpting. I knew I needed various rocks to create a modular set to build upon so I went into ZBrush to do so. I deformed a cube with bevelled edges to get more rounded corners and with the move tool and dynamic I was able to get more organic rocky silhouettes.

The bulk surface detail comes from the Orbs brush pack by Micheal Vicente which I sculpted rocky noise into the surface. I repeated this for my stalagmites and modelled the remaining assets quickly in 3DSMax.

I knew I could easily use one texture sheet for all props and another for the rocks/stalagmites/archway. To keep better surface values my rocks, reuse my tileable vertex painting textures but blend the normals in engine. In engine I created a recolor shader for more reusability from my modular kit.
Creating Portal Shader:

For the portal shader I started by getting a variety of noises from Substance Designer such as Clouds and Grunge leak. I then was able to warp my UVS to suck up the textures similar to a portal by adding a panner and VectortoRadialValue together.
I added various lerps to control the colour values and blend the outer edge to the centre with radial gradients. A portal is made up of a black hole centre, swirling vortex middle and a harsher outline so by reusing the radial gradient with a step node I could easily chisel out an outline. The final result is easily to animate spawning as it requires dragging the size up and down to draw it into the space. This made it easier to animate in level sequencer.
Creating Painterly Post Process:

In my previous shader project, I experimented with a frosted post process shader so for this quick project I wanted to push to a more stylised direction. To create this, I reused my rock normal to distort the view into two patchy directions similar to paint strokes. I then got the base outlines between objects with the offset node by adding them together and blended a subtly outline on top to breakup props in the distance.
For breaking up asset values, I used the offset blur to generate outlines that were fairly thick and large but with faded opacity which created more patches for value breakup. At lower intensities the effect creates a good, stylised feel that remains constant thanks to the world normals that project the distortion consistently across the 3D world.
Overview:
In summary this project was whilst one of my shortest ones yet, a great problem-solving opportunity to build a mini diorama to push my technical skills. I enjoy creating shaders and being able to explore more post process and animated shaders like the portal was a lot of fun.

I also was able to test my delivery time on 3D assets since working on a freelance project I wanted to see how long terrain would take me. There are some points however I want to improve on such as making foliage and shaders related to greenery. For upcoming projects I will definitely keep foliage creation in mind. I also think the animation came out great however the hat physics could definitely be improved as it looks a bit stiff due to me having to manually keyframe it.

Bibliography:
vicente, Michael. “Orb Brush Pack, Michael Vicente - Orb.” ArtStation, 2025, www.artstation.com/artwork/9kwVo .
Peaches Lamb. “Shrine (the Legend of Zelda: Breath of the Wild OST).” YouTube, 3 Mar. 2017, www.youtube.com/watch?v=4IakZtHzBL8 . Accessed 29 Jan. 2026.
Sound Effects For All. “Thump Sound Effects 2.” YouTube, 3 Feb. 2024, www.youtube.com/watch?v=mcsT-keA2qs . Accessed 29 Jan. 2026.
Rayne Beckman. “Evil Magic Spell Sound Design.” YouTube, 5 June 2023, www.youtube.com/watch?v=RZtMFFudEw8 . Accessed 29 Jan. 2026.


Comments