
Ruined Cottage Generator Blog
- Apr 18
- 6 min read
Updated: Jun 27
Introduction
Hello there, this post entails the development of my procedural cottage generator inspired by Atomfall. This generator uses Houdini to place modular modelled pieces into final buildings with controls, seeds and dropdown for finer artist control. Currently a work in progress.
Project Outline and Inspirations

The goals of this project are to get better at constructing buildings procedurally and build a good modular kit along the way. I’m quite inspired by Atomfall as after playing through the game I felt very nostalgic of summer trips to the Peak District and the lovely British cottage side (minus the radiation and ferals).

It’s also a great excuse to gather more reference by popping out with the upcoming summer weather. I dove through my reference pictures from trips and settled on trying to create a good kit to create the slate rock buildings of Wetton Village. This village is close by to Thors Cave a fantastic hilltop cave that I visited last summer with my friends, it has stunning views and great country surrounding the village.
Let’s breakdown this projects goals:
Create a procedural building generate int the style of northern cottage buildings
Be able to randomise the building with seeds
Support a variety of building types – tavern, inn, pub or shop through a dropdown
Place windows and doors at specified spots using tagged assets
Link shaders to the tool to apply worn vertex painting and dynamically change colours
Optimise cost through LODS and instancing within Unreal Engine
Some stretch goals:
Spawn decals to apply staining and damage
Apply vertex painting to instancing for ruined wear
Spawn additional set dressing on top like lamps, window flower planter, signage or vines
Write documentation
The timeline is not fully determined for this project as the university term is starting again, I will be busy with teaching however I would like to wrap it up before the middle of May for the base stages and push it further later on (maybe interiors?). I’m also taking partial inspiration to the phenomenal building breakdowns Embark released a bit ago from their game Finales do check it out: https://www.sidefx.com/community/making-the-procedural-buildings-of-the-finals-using-houdini/
Modular Walls – Make and Place

I modelled my modular walls in 3DSMax and set their dimensions to be 250 height and 200 widths. I got these numbers through some trial and error of measuring various references of cottages and creating a master building blockout (based on Danescombe Cottage). I explored further sizes of shorter pieces, but this made putting them together very close and strange compared to my reference.

To start the placement, I created a box and isolated the bottom border. From this I resample the points to be every 200 and spawned my walls. To make them rotate properly I used the normal point value to force a different transform of the pieces. For randomising the pieces I used a attribute randomiser to set a value random between 0 and 2 for choosing either blank wall, door and window.
Fixing Broken Resampling

I did encounter however a problem that if the inserted box was not evenly divided for 200 by 250 it broke the placement resample. To resolve this I used a bounds node to recalculate the spawning box into a box that does fit the dimensions using a wrangle. This will also ensure any other procedural placement resample will fit as long as the modular pieces are modelled to be 200 by 250.
Vertex Shaders for Walls

I wanted to test if some randomised vertex painting values on the walls would work. The current generation is mesh based not instanced so what I did was randomly spawn sphere to create splashes of vertex wear data around the walls. This worked quite well however will need to be reworked once the HDA is packed to respond in UE with its instances. The current vertex paint uses red channel for wear of paint to the stone and green for dark moss wear around window and door frames.
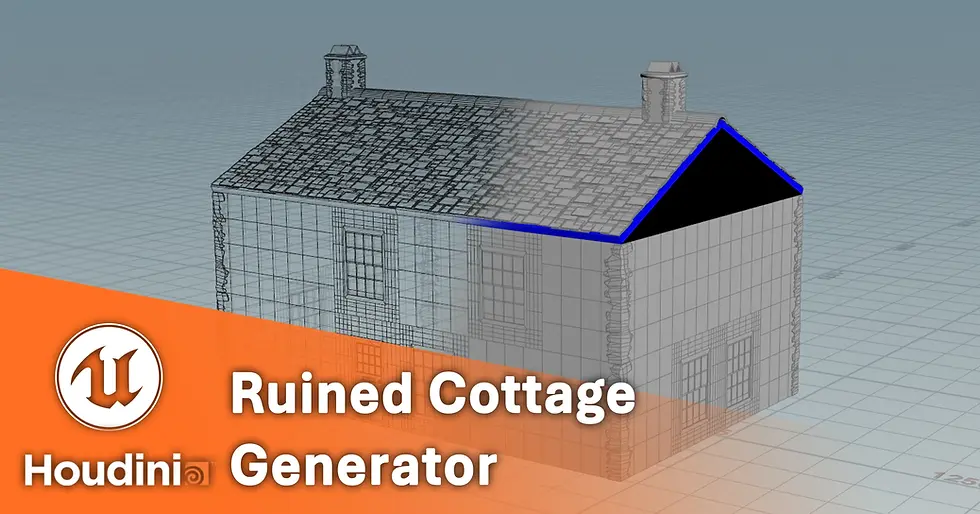
Placing Roof and Shingles

To place the tiles on the roof I first tried to manually fix the normals for each direction however uncovered that its much easier to resample the existing roof borders. A normal breaking node I accidentally introduced was the point jitter as this has a toggle to overwrite the normals too which originally made all my shingles face upwards. I also changed the ridge tile to be rounded to better fit the shape language of my master painted cottage reference - Danescombe Cottage. For determining the spawn point I used the bounds of the top of the border to get the areas to begin calculating the roof. For spawning the chimneys I used existing lines but chose the last 2 points to spawn them in as they appear prominently on the ends of the house (I assume due to where a fireplace is located for kitchen and living area).
Automatic Storeys and Building Up

After spawning was working well manually, I knew I had to add a method to automatically detect how many stories high the cottage needed to build. To do this, I added some for-number loops and used my previous scale calculation to figure out how many stories heigh the blockout was by diving by 250. I then took away one as if it was exactly one story the loops should not run, and the initial floor should be the only spawning part with the door. This broke some logic that ran on bounds of the final house such as the quoin and the offset, so I just added another loop to add more quoin per each level as it generated the floors. Wrangles are phenomenal you can add any inputs and utilise iterations and all sorts of detail from the panels throughout an entire graph! Onto gutters next to make the roofs pop more.

Broken Gutter System and Gables
My foundational system for gutters reuses the spline curve created for the roof. It resamples each middle section for the curve to 100cm (half each wall) instead and places the modular gutter pieces. For the comers, they are replaced with a larger 200 cm piece but 1 is chosen to be the drainage gutter corner that has further pipes leading to the floor. These vertical pipes are 20cm each to ensure enough of them are generated to fit to the floor. To calculate this the top of the chosen drainage corner is selected with a point inside. This point is tagged and extracted; a copy is offset to the floor minus 20cm so the final curved point can be spawned. I also wanted to add fables but had them clip into the top of the roof.
To fix the gable issue, I created a gable model that will spawn complete with rooftop. The roof has a minimum spawn height now too which means even at the lowest height the gable should still fit to the rooftop and clip in naturally. The sides have slates for the ridges which are placed procedurally on a curve up to where the clipping begins and ends.

PCG and Part 2 Electric Boogaloo
Currently my primary issue is that if I package my tool into a HDA a lot of elements breakdown due to me using a set scale that I setup quite inconsistently across various points of my generation. As I had not exposed parameters earlier, I now have to dig through VEX and networks to figure out what breaks next. Due to this I did consider swapping to PCG as the logic and way I built it to generate based on a box worked quite consistently.
Tool Features
However after digging through some tutorials, I struggled quite a bit with understanding what nodes I needed to use and so I instead to start from scratch with Houdini instead to build a better and way more stable HDA. This is version 2, and with it I was able to add Grammar as part of input strings for better user control. It took me over a week to finally put back together but now it works!
Great old building logic all the way from UE3! Really fantastic documentation that has inspired many features on V2 sent to me by my mentor: https://docs.unrealengine.com/udk/Three/ProceduralBuildings.html
Introducing Little Ashton

To test out my tool I built a small village town centre area to have a variety of different buildings. I;ve named it Little Ashton in honor of a local little village nearby me that I drive by to pop to my friends. Looking at the way building generators worked in PCG, I added grammar controls via VEX strings which are broken apart then duplicated per index as part of modulo % alongside door tag overrides using geometry tagged in UE and semi-working occlusion detection. All of these make it quick and easy to construct a whole town. I spoke with my mentor Jon Murphy and he emphasized that whilst the town is great, it’s best to focus on that street to manage time for this project.

I would like to get it wrapped up for Develop Brighton after all so I will use this blockout of “Jekyll Street” to test features and ensure the design and vibe of the buildings matches my references. I’m basing the pub “Wyrdd Sisters” and its drinks all off of my favourite literature such as the same book series by the name “Wyrd Sisters” written by Terry Pratchet knocking off Macbeth, Jekyll and Hyde by Robert Louise Stevenson, The Picture of Dorian Grey by Oscar Wilde and much more little trinkets that I would like to add to signage, graffiti and narrative details after the procedural generation is done. Here’s my currently rejigged plan for Develop Brighton:

Comments