
Texture Utility Tool - PyQt
- Apr 6
- 8 min read

Introduction:
Hello there, this blog post will go into my texture utility tools development in more detail and breakdown some key points in its making. The original purpose of this project was to improve on an old but frequently used image script that I use to maintain this blog in .webp format. I easily realised I could adapt and expand it to fill my lecturing job’s purpose of making textures easier to manage after they have been exported. Let’s dive in.
Getting the Tool:
Head over to my main site page to download it and the documentation!
Currently updated to version 2.5 on the 17/06/2026
Tool Function Overview:

This tool can make managing textures easy especially in large batches through its loading function. You can load multiple files to adjust and tweak using the tabbed modes. Currently the tool can: convert textures between different file formats, rescale images, split and combine files based on colour channels. When creating each tab, I simply went back to my original QTDesigner file and added more within the tabbed frame I needed to work on next. After converting into Python in the Terminal, I was able to paste additional changes directly over to my working master file.
Converting File Types:

Based on its original function, this tools first tabbed view is the file converter. By selecting from a combo box dropdown, any loaded file will save as that selected type on export. During development I encountered a problem when saving with PIL when the image format was RGBA but saving as JPEG. Additionally, jpeg images have extensions such as .jpg or .jpeg which added more hassle to the mix. To resolve all issues, I check twice for if the file its coming from is a jpeg or jpg and when saving what channels it has. This also resolved a problem I was having with thumbnails breaking when loading Targas as the file format is not supported viewing wise by QTDesigner, so I convert any image that is currently viewed from its stored array into a jpeg, then update the label and swiftly delete it.
Estimating File Size:

The biggest rabbit hole for the project was getting a working file size estimate. I know not every artist will understand the different a jpeg has over a png or why targas are denser file wise so I opted to create a small function that can give you a rough estimate of what the final size maybe of the file loaded in viewport. For this I setup a test run of a bunch of differently sized images and ran them through the tool and recorded their resulting file sizes. I quickly realised that there is so much more behind the scenes when it comes to accurately depicting the size however it all came down to how it was saved. Some exports compress and pack data differently so whilst my data was reliable for some aspects of PNG to Targa it broke down largely in areas of JPEGS. I couldn’t understand how to get more data out of Pil to better read this or predict it and honestly considered scrapping the feature or having it convert then delete the thumbnail as a test run. But I didn’t want to risk running out of storage on the end user or breaking during this feature, so I plugged in the most predictable numbers into a “multiplier array”. This array is actually built of many other arrays; in the future I would combine them however for easier calling I made them all separate as the math greatly varied with what the starting format was. Going from jpeg to targa was different from targa to jpeg for some weird reason (probably more compression) during my testing so these arrays have hardcoded values to hopefully give a very rough estimate of what the file could be. Ultimately these files would be further compressed and manipulated in a games engine so not being fully accurate in this tool is not the end of the world.
Rescaling Images:

The tools’ secondary function is rescaling images. For this section I got a bit too crazy with the tabbed views and ended up making lots of sub options for the user when scaling their images. The basic function of scaling textures is upscaling or downscaling, so I made a dropdown of common sizes based on my experience as a freelancer available to use. For sub options I expanded the set to include more control via directly upscaling or downscaling percentages for each loaded image. For an odder method I also added a match scale option that uses the thumbnail as the master scale to fit onto other textures which is helpful when matching texel density on tileables. All of these are toggleable from the same function that looks for the “mode” when toggled on click down on the rescale button. I ended up having issues just calling the function as I needed to define a parameter, so I used lambda to override it in the connect clicked line.
Packing Channels:

This proved to be one of the most fun sections to get working as it was simply the reverse of what the splitter would be, so I got two birds one stone with the logic. So, after a use loads a bunch of files into their respected slots in an array the function converts them to linear as grayscale and then packs them into a RGB file. I used my same statements to prevent the RGBA issue on save if it’s a JPEG as it kept breaking things but in the end the logic is the same, you pack each channel into a tuple new image then save it.
Splitting Channels:

To make life easier for the thumbnail portion of this function I wrote another that only creates a function from the split channel, converts to temporary jpeg for a thumbnail and returns it. I haven’t used returns much as all the logic I needed just existed in the main function I was working with however it cut down a lot on unique statements and repeating lines. The save functionality here also stores the folder location to the same one between the combiner and splitter making it very quick and easy to split up and recombing textures as needed.
Resolving Path Issues:

After packing it all together with Pyinstaller I go a pretty big issue after running it, all my default icons and images were gone. This was due to a path issue as the packed version was in a different folder than the rest of the data and could change when moved around. To get around this I added an extra line that runs on startup to start a function for loading a path from a config.txt. This simple line updates the broken parameter for path and after setting it, correctly displays images. Additionally, it makes a blank file if it can’t find it so you can easily edit the newly created one, if confused where to put it manually.
UI Development Overtime:

As I was getting more comfortably working in QTDesigner I realised that my original UI pass was not going to work. My first iteration had a simple tabbed view that changed the entire window per function. However, this would mean a lot of repeated labels for the thumbnail preview, buttons to swap between them and much more repeated parameters. To improve on it I recorded the tabbed view to exist in half the window and only affect the direct functions themselves, making it more consistent as you used the tool.
Project Conclusion and Reflection – Old vs New Tool:

To reflect on this project, I am very proud and pleased with the final tool result. There are still elements I could improve like the style and colours used to be more aesthetically pleasing and there are always more things to grab from PIL to adjust images e.g. blur, sharpen or noise. However, it fulfils its purpose way better than the old script and runs reliably which the old one would not do. Using QTDesigner for the first time showed to me what a fantastic blend of GUI and widgets it has that blends the best of an Unreal Slate Widget interface with Maxscript GUI but running Python. If I knew about it prior to TKinter I would have definitely taken it up sooner however I am not going back now. The speed of iterating and directly getting elements working like a tabbed view or file folders buttons is way easier in PyQt. I know that the original module is reliant on C as a language so to get even better at building tools it would be best to learn the language. So, my next challenge after I crack onto making a building generator in Houdini (I have some pretty cool ideas for that project) will be to return to make more tools using PyQt and eventually do some C. In making tools the underlying logic is the same so if I can get my head around syntaxes and rules for formatting, I am certain I can dive into it more then too. Do stick around for that or checkout some of my other tools on my main page!
Massive Overhaul - VERSION 2.5!
So I'm back with a massive overhaul that changes not only the visual design of the tool but adds 2 massive additions that make it much more useful. Let's quickly recap over them, the tool is still free to grab if you'd like a copy!
New UI

I've received a lot of feedback about the UI and UX of the tool which I totally agree with. These points highlighted the tools harsh colour schemes, random button layouts and overall unnecessary bulk. To improve the tool I took it back into QTDesigner and tried to closely match 3DSMaxs ribbon UI layout in colors and gradients for a more compact and modern look.
Engine Repacker

Most recently my friend James who is a 3D artist pointed out that a repetitive process that could be added to such a texture tool is an engine file converter for PBR maps. As Unreal has arguably better lighting than Unity, for presentation at least this would make a very useful tool to have to help seamlessly convert files between the two engines. I initially took a bunch of exports using the correct Substance Painter settings to reverse engineer changes but soon realised it's all written on each engine’s respective documentation. The main difference between Unity and Unreal is that smoothness aka Roughness is stored in the alpha channel and is inverted if using the unity universal pipeline. If using the hellish HDRP then its stored also in alpha but has an AO and detail map inserted into it. This tool supports converting between these two by also flipping the normal direction due to the different rendering engines.
Texture Sheet Atlaser

One common practice I've seen done is combining smaller greyscale sheets to large square quadrants aka atlases to reduce unique memory cost of each texture file. I used PIL to accomplish this by "pasting" data across to each half area of the inputted size and then saving out the new file.
Fixing Bugs and Battling 16 Bit Greyscale
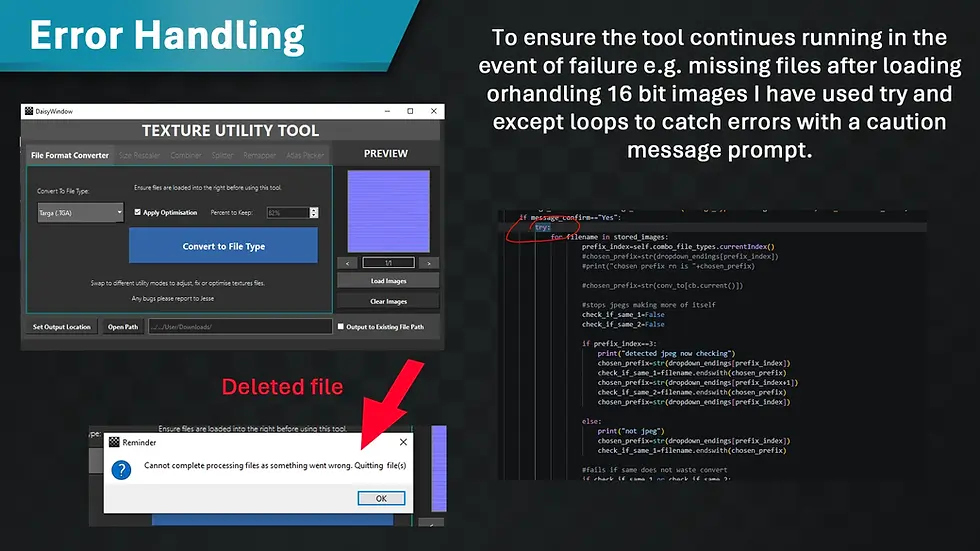
I've spent multiple days simply fixing bugs that cropped up with the addition of adding new tabs which includes a devastating bug for rendering 16 big greyscale maps. PIL cannot handle them well and this means a lot of PNGS and Targas actually cause the tool to break by loading in an image. To remedy this, I’ve used NumPy where I could convert to an atlas the entire channel and then back again into Linear map as PIL when converting to Linear itself just ramps up the exposure and makes these maps super white. This resolved it for most maps which I'm satisfied with, but I know to improve it in the future it would be best to rewrite the tool to seek this data out earlier universally.
Anyways that’s version 2.5 I may continue to update the tool in the future but for now it has good error handling so even if the worst-case scenario of your files moving to a different location the tool will pause and warn you before taking any actions. Onto my other unfinished projects!
Textures Used in Demo Video:
Wood: Savva, D. (2025). Wood Table Texture • Poly Haven. [online] Poly Haven. Available at: https://polyhaven.com/a/wood_table.
Brick: Tuytel, R. (2025). Red Brick Texture • Poly Haven. [online] Poly Haven. Available at: https://polyhaven.com/a/red_brick.


Comments