PCG Scatter Tool Breakdown
- Jesse Olchawa

- Aug 24, 2025
- 9 min read
Hello there! This is a breakdown blog for my PCG Scatter Tool. If you prefer a verbal demo video, I highly recommend watching my video here however this post will go into much more depth regarding my nodes and process.
Setup – Structure and Data Tables
Let’s begin with the data itself, the meshes that will be scattered in the tool. Our user artist should be able to efficiently and quickly add their meshes to a list to be used.

For this we will need to start by creating a structure asset. Here we can define two key values fed into the PCG, the static mesh itself and the weighting. Now we can create a data table which is based on this structure. Here is where the meshes will be inputted. You may notice that the structure when updated will automatically update the data tables, this is great for adding more controls later should the artist want to tag assets or do more changes. For now, let’s go back to the blank data table.

Manually adding data is easy but when wanting to scatter a large collection of assets such as a foliage pack with 90+ meshes, your user will lose a lot of time and potentially get frustrated (I know I did). So here I created a simple action utility script using an Editor Utility Blueprint titled Add Mesh to Data Table.
Add Mesh to Data Table Script

Starting off with a quote from great technical artist at Epic Games, Mat Oztalay “The first thing you want to do with your editor utilities is undo them”. The blueprint has transactions placed throughout to ensure you could undo your progress if you accidentally selected the wrong assets for the data table. Next the blueprint grabs selected assets, casts it (fails silently if not static mesh) and add their data to the inputted data set. Simple and effective. If you want to further limit the user using this on incompatible assets, you can filter where it appears on Editor for only static mesh assets. They should then be able to see the following below.
A common issue I get is you have the data table open; it remains blank until you close it and re-open it again. I believe this is an editor issue for refreshing the asset since the script works in the background and doesn’t force a refresh so do not be alarmed if the data table is empty, just refresh!
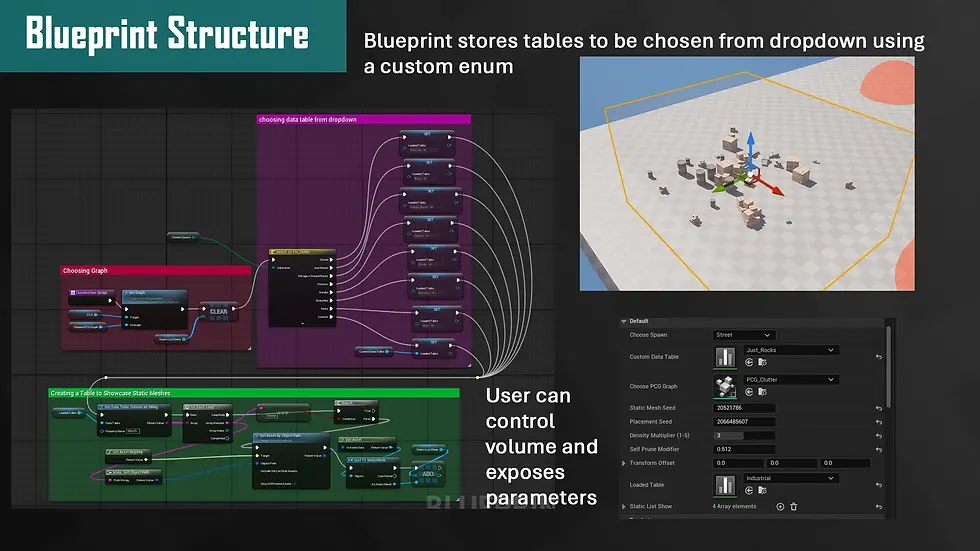
Breaking Down Main Blueprint:

To make presets easier to access for the user, I created a custom Enum that has dropdown options for some core data sets already assembled. These are:
· Street
· Just boxed
· Foliage and rocks
· Flowers
· Shrubs
· Branches
· Moss
· Custom
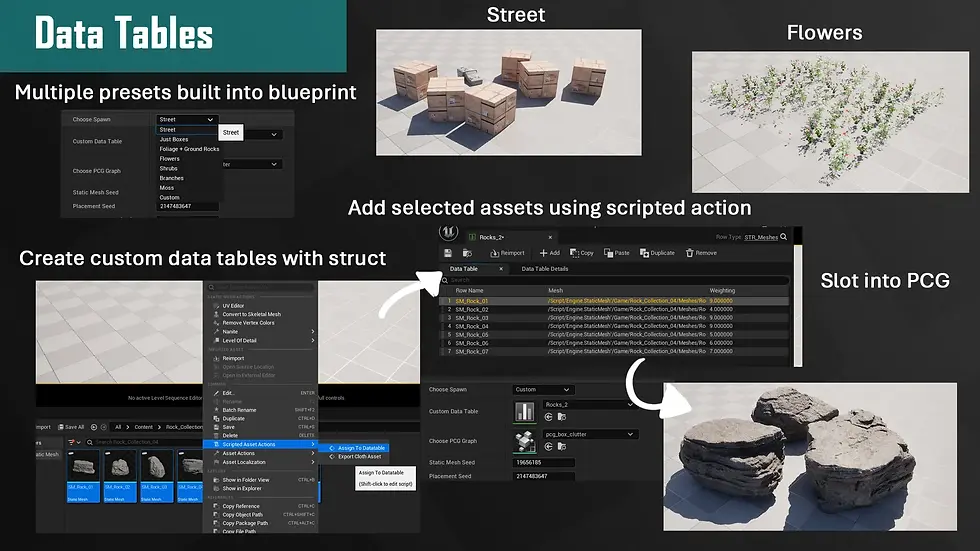
Out of all of these I’d have to say the last one custom is the most important as the user can directly use their own slotted data table in the blueprint instance. This allows fine tuning of what meshes should spawn.
Visual Debugging – Mesh Array
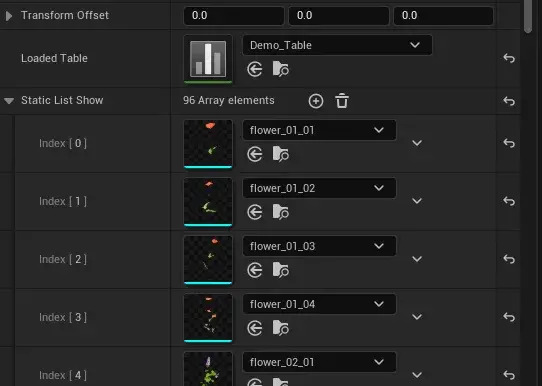
One feature I added to the bottom of the script is the static mesh array; this pulls the selected meshes from the data table into a list so the user can check they are working the correct mesh. This does not support back and forth tweaking purposely as users can then overwrite the original data table by removing meshes which can have a global disastrous effect on other PCGs.

PCG Graph 1 – Clutter

My master graph and the most used placement graph out of the 3 is a standard clutter spawner. It uses a volume spawner (the cube on the blueprint) to spawn points within bounds. From here I filter using the points X and Y values to get the centre. If you prefer to simply spawn on a surface more predictable you can opt for a surface sampler node without this.

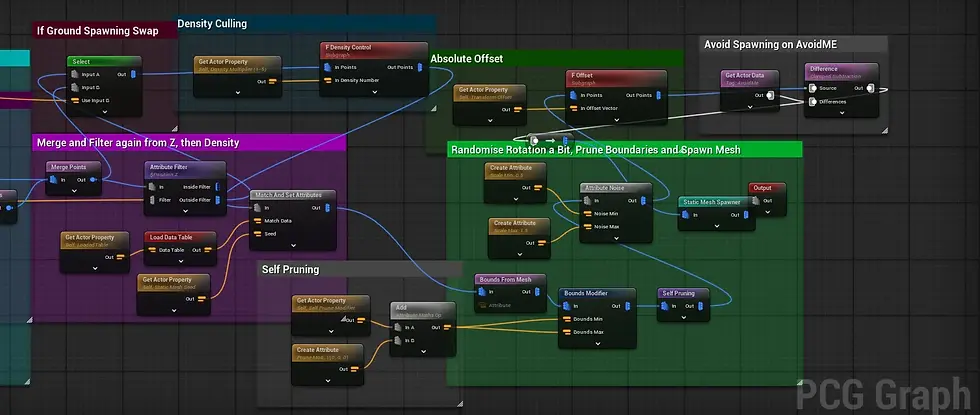
As I’m using volume which can also cast points into the air I filter by the lowest z position next to get the ground points. This can be further improved to be adjustable to the user if they want to spawn points in the air as well. This is also where I introduce my secondary spawn mode in the same PCG, edge spawner. Level designers need to clutter the edges of maps can shove the volume to a wall, and if points of elevations are detected it will swap to this mode by using a select node counting the get points.
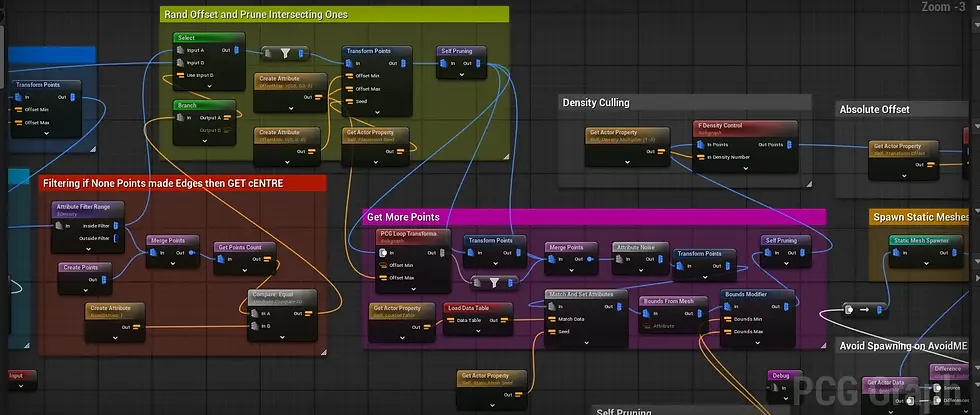
If this is not the case it will fail silently. After some randomised offsetting which is exposed via a seed to allow the user to iterate consistent results we move onto spawning the meshes. As we have a data table, we can call fort the actor from the blueprint LoadedTable however if you are using just a PCG system on its own you will need to expose this data table on the parameters tab in the PCG. We first use a match and set attribute to randomly match a data table asset to points with weighting. Now we need to do some cleanup via culling with prune nodes. Since we have set the static mesh before we can use the mesh bounds to get a better result when pruning our points.
This can be done with a bounds from mesh node set to the mesh column, from here I exposed a float that is converted into a vector that multiplies these bounds. At 0 the meshes can be spawned intersecting for foliage but at higher values such as 0.6 clipping will be eliminated. I then use two sub graphs before another cull check and spawning the chosen meshes:
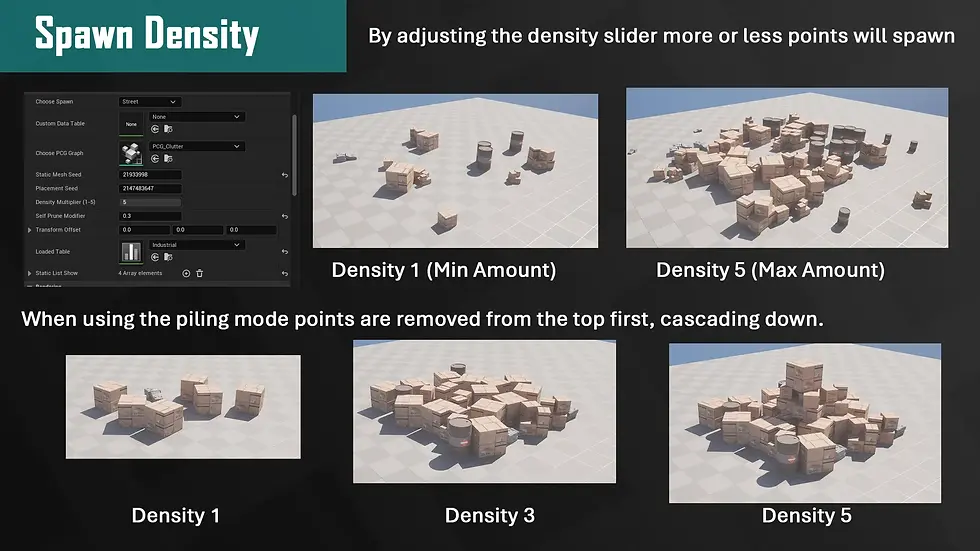
Subgraph Density Control:

Density control is the exposed integer slider going from 1-5. This gathers the final number of points and eliminates points in increments of 20. 20 multiplied by 5 is 100 so at 5 the density is at its most, at 1 the points have been reduced to just 20% of their original value. This can be done with the random selection mode to forcefully export out a random number of total points whilst discarding the rest.
Subgraph Offset Transform:

This is a simple exposed transform points that allows the input offset vector to change the transform right before spawning the meshes. I chose a subgraph for this task so in the future I could easily expose more parameters such as scale, rotation and more without having to edit all existing PCG graphs to match.
Preventing Spawning in Tagged:
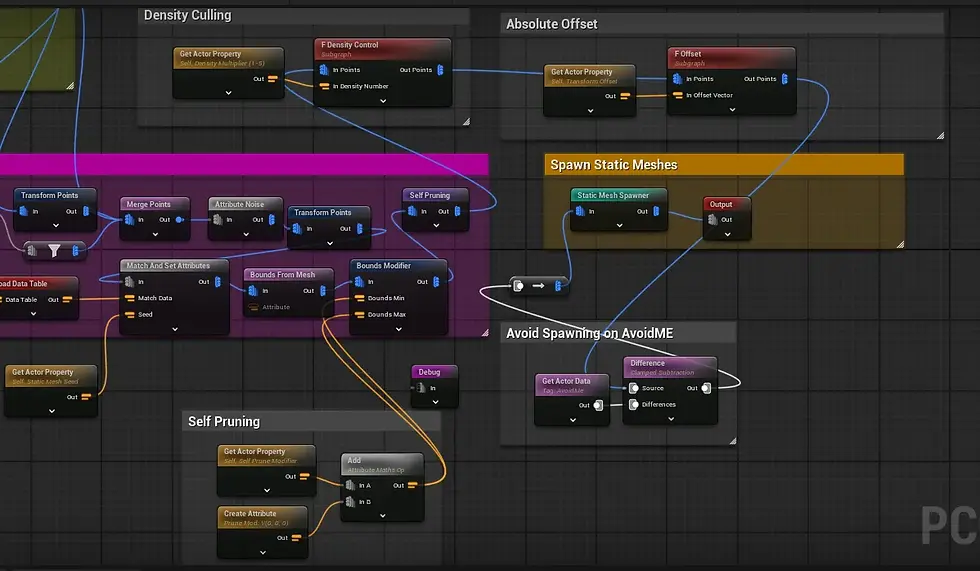
For consistent results any objects which are tagged “Avoidme” and are within the volume tab are used as a subtract node on existing points. Make sure they are tagged under the get actor node to be within the volume or else the PCG will have to look through the entire level, which becomes costly. Following this static meshes are spawned. Here is a short video of using this mode .
PCG Graph 2 – Box Clutter

Now we have a general scatterer another method that would prove useful for larger piles especially in vertical orientation is that of a pile. For this logic we begin with a surface sampler instead to directly grab all points cast from the volume downwards. Unlike the filtering based on position before we will be grabbing the centre XYZ and forcing all points to have their transforms set to that same coordinate. This will allow us to build out a randomised scatter of points like a pile of boxes.
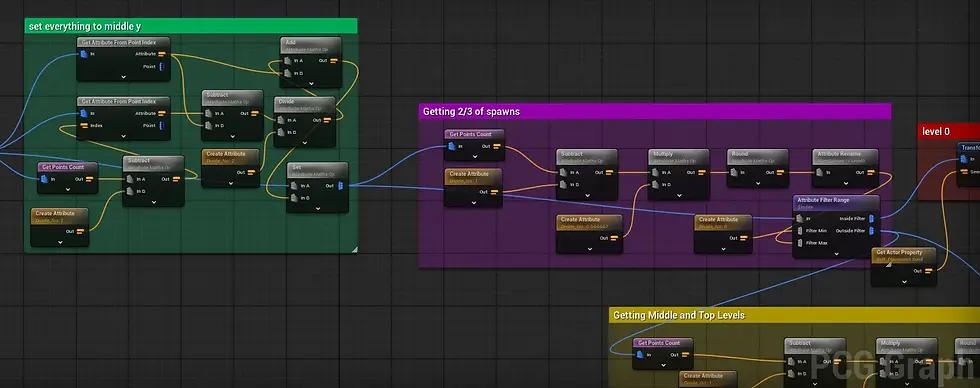
However, we need to have more points on the bottom of this spawn than the top, so I got the total amount of points and multiplied it by 2/3. By filtering the index values, we can grab anything above this value range to be separated whilst the rest will remain on the bottom and be scattered. Those above are offset by their boundary value and then offset less to ensure they are still clustered around the centre point.
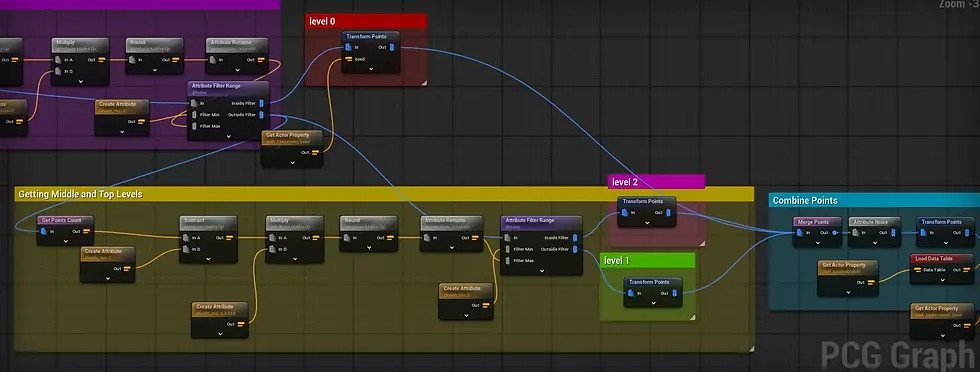
The final point in the index is then moved to the top of the pile to create a pyramid of levels. After combining points and setting them to our data table as usual, pruning on boundaries there is an issue of density culling. Beforehand the subgraph of density culling would randomly grab and delete values until they match a certain final total amount which when used with this PCG will create floating meshes. To alleviate this, I have tweaked a variation of this sub graph.
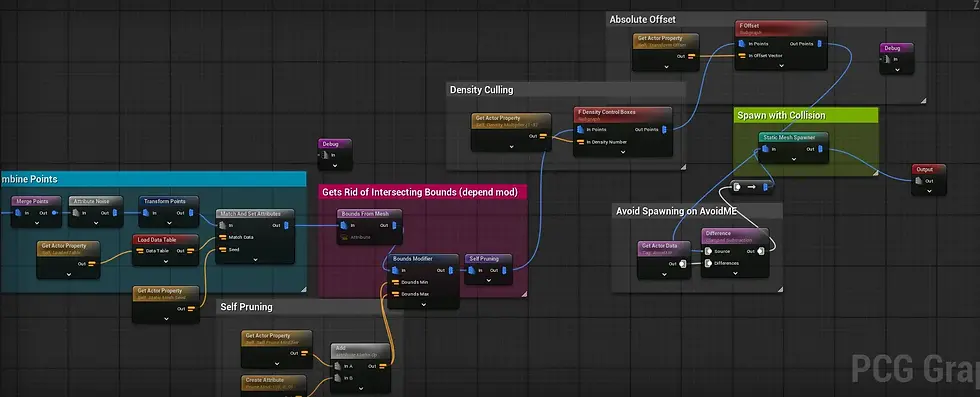
Subgraph Density Control for Box Piling:

This graph sorts all points by their position Z and then filters this index like used before from the top. This means when the density slider goes from 5 to 4 the topmost points are removed. Using this sort of method works well to get rid of floating elevated meshes. Here is a short video showcasing edge detection adn culling from this mode and others:
PCG Graph 3 – Foliage Scatter
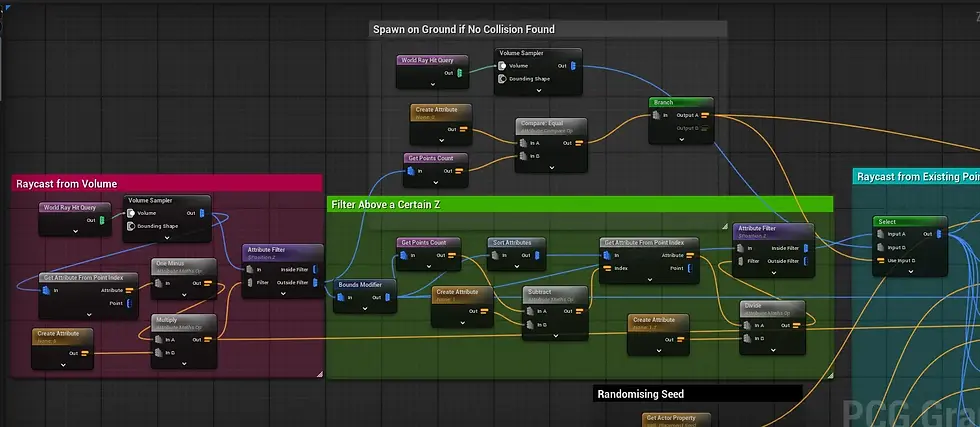
The final graph spawner uses ray casting to make more organic spawning of points. For this I used a world ray cast into the volume sampler to grab points over surfaces. From here I filtered out points from the lowest z position to get rid of ground spread and focus on verticality. However, this did break foliage spawning on floor level elevation so using a select node that gets the point count you can bypass the filtering if there are 0 points detected.
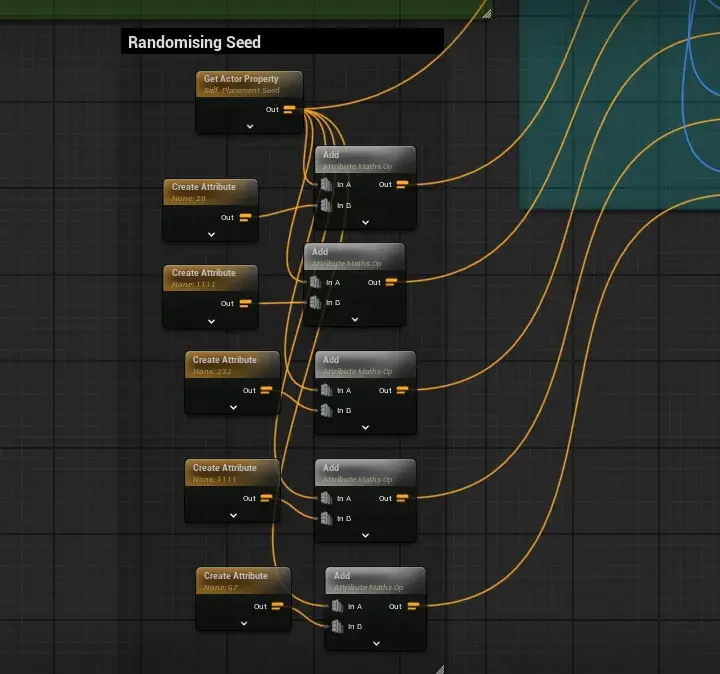
Furthermore, these points are then offset to cast new points from, adding more density. This density is filtered in the same way as the main clutter method using mesh boundaries and density slider.

However, unlike that graph it’s better to leave the boundary culling at a lower value of 0 as foliage tends to intersect so getting rid of mesh bounds give s amore overgrown lush outcome.
Before the mesh is spawned there is some random rotation applied alongside the offset transform subgraph to help raise some points up. If you are scattering across terrain that is high bumpy, it may be best to raise the z value up, so the grass is closer to the surface. Here is a quick video of this mode:
Conclusion:
I really enjoyed making this tool as coming from previously making a Houdini tool, it helped me get another perspective on how to setup a lot of behaviours such as centring points from scratch. Additionally, I had a far more stable experience pushing values around from the blueprint to the PCG than I have had dealing with static meshes in my Houdini HDAS. However, I do miss the lack of a nicer UI to deal with as there is very little control on how elements are setup/tabbed for the user to interact with.
I did at the beginning of this project attempt to create this as a widget that talks to a master PCG and toggles values on and off however found it tedious. Splitting the tool into two separate pieces meant artists would always have to run that widget, then click on the PCG in the level to edit it. This however generates everything on each blueprint instance and is easy to edit.
Furthermore to improve this I would add the PCG graphs as Enum values to make a dropdown available to the artists. All the static meshes used in the data tables alongside video demos I learnt from are linked below in my bibliography. Please do check them out!
Paste My Graphs:
Clutter Blueprint - https://blueprintue.com/blueprint/ow2047qd/
Add to Data Table Script - https://blueprintue.com/blueprint/x3s0j5f7/
Regular Scatter PCG - https://blueprintue.com/blueprint/-r1ae051/
Foliage Scatter PCG - https://blueprintue.com/blueprint/u0_ib67j/
Box Pile Scatter PCG - https://blueprintue.com/blueprint/fg6d5n8m/
Density Control Subgraph - https://blueprintue.com/blueprint/yahnibbx/
Density Control Boxes Subgraph - https://blueprintue.com/blueprint/ae13cpn4/
Bibliography (Meshes):
Fab (2019a) Construction Site VOL. 1 - Supply and Material Props, Fab.com. Available at: https://www.fab.com/listings/ba44a508-bfa5-444c-bbf4-69e8b5dee530.
Fab (2019b) Procedural Nature Pack Vol.1, Fab.com. Available at: https://www.fab.com/listings/d3a29766-c848-40c5-ad3d-d609b80d224b.
Fab (2024a) Abandoned House, Fab.com. Available at: https://www.fab.com/listings/d8fcc1b2-9e26-4964-839d-1c2fdbd29e8f.
Fab (2024b) Environment - Rock Collection 04 (Free), Fab.com. Available at: https://www.fab.com/listings/a51e61ac-98fa-4c54-ab23-fc533687afb7.
Fab (2024c) Plants Pack, Fab.com. Available at: https://www.fab.com/listings/6496cf3b-2e06-4708-91e7-b14f77b12fef.
Fab (2024d) temperate Vegetation: Foliage Collection, Fab.com. Available at: https://www.fab.com/listings/6a5ae8db-d80f-4b23-b276-87da390cfe56.
Fab (2025a) Old Wooden Bench, Fab.com. Available at: https://www.fab.com/listings/87d9cbad-f532-41e7-ae51-87f5c030d687.
Fab (2025b) Vehicle Variety Pack Volume 2, Fab.com. Available at: https://www.fab.com/listings/591e3b3f-9d49-4cd2-8e28-d471c1a10cab (Accessed: 24 August 2025).
Bibliography (Videos/Resources):
Adrien (2024) Adrien (@amathlog.bsky.social), Bluesky Social. Bluesky. Available at: https://bsky.app/profile/amathlog.bsky.social/post/3lbklhc3mj22i (Accessed: 24 August 2025).
bakedMystic3D (2024) 48 | Tutorial | Filtering PCG points by height - Unreal Engine, YouTube. Available at: https://www.youtube.com/watch?v=NJ9n-sicxkw (Accessed: 24 August 2025).
claaudius (2024) create PCG point on mesh (ground), Epic Developer Community Forums. Available at: https://forums.unrealengine.com/t/create-pcg-point-on-mesh-ground/1275183/3 (Accessed: 24 August 2025).
epic games (2025) A Tech Artists Guide to PCG | Knowledge base, Epic Games Developer. Available at: https://dev.epicgames.com/community/learning/knowledge-base/KP2D/unreal-engine-a-tech-artists-guide-to-pcg.
FreetimeCoder (2023) PCG Scattering Points - Unreal 5.2 Tutorial - Part 3, YouTube. Available at: https://www.youtube.com/watch?v=cgC9zDxxOB0 (Accessed: 24 August 2025).
Isaac Oster (2025) PCG Basics - Branch and Switch, YouTube. Available at: https://www.youtube.com/watch?v=urspvGukRwA (Accessed: 24 August 2025).
JBarlowTraining (2024) Unreal Engine 5 Tutorial - PCG - 3. Spawning Actors and Meshes, YouTube. Available at: https://www.youtube.com/watch?v=sBzNoaz--6I (Accessed: 24 August 2025).
Reality Forge (2024) Unreal Engine 5.4: Create a Cinematic Cabin Scene with PCG, YouTube. Available at: https://www.youtube.com/watch?v=AobpAYMZOJM (Accessed: 24 August 2025).
Unreal Engine (2024) Accelerating Your In-Editor Workflows with Editor Utilities | GDC 2024, YouTube. Available at: https://www.youtube.com/watch?v=m6mJ9r7ytks (Accessed: 24 August 2025).


Comments